How to Stop a Faucet from Dripping: First Checks
Check whether drips continue, identify their location, and verify safe shutoff before buying faucet parts.
Quick answer: If a faucet drips after the handle is fully off, first establish where the water appears and whether it is an ongoing leak. Dry the spout, handle and sink, operate the handle normally once, wait and observe. Identify the faucet model and locate its working under-sink hot and cold shutoff valves without forcing them. Persistent drips from the spout usually point to a worn internal valve, cartridge, washer or seat—not a dirty aerator. Stop if the leak comes from a supply hose or any shutoff valve is seized or leaking.
This is a first-checks guide, not a universal cartridge replacement procedure. Single-handle mixer faucets, two-handle compression designs, ceramic-disc mixers, touchless and pull-down models all differ. Taking apart an unidentified fixture can damage a seal or leave you without reliable isolation; use the manufacturer’s model-specific repair manual for the next stage.
First, distinguish a real leak from leftover water
- Turn the handle fully to its ordinary off position without cranking or using tools. Some fixtures need the lever centered; older compression handles should not be forced tighter.
- Dry the aerator/spout tip, the base of the faucet and the sink deck with a clean towel. Look underneath the basin for an existing wet patch.
- Turn the faucet on briefly, then off. Observe whether a few residual drops end quickly or whether drops continue after the outlet has emptied. Repeat the check later if the pattern is unclear.
- Note exactly where moisture originates: spout tip, handle, base, under-sink supply line or drain. Take a photo or short note to match a model-specific troubleshooting guide.
Water left in a spout or pull-down hose can sometimes drip briefly after shutoff. Continuous new droplets with the handle off deserve repair. A paper towel wrapped around the handle can help reveal a handle leak that travels down to the base; Moen recommends distinguishing these leak locations rather than treating every puddle as a spout failure.
Use the leak-location map
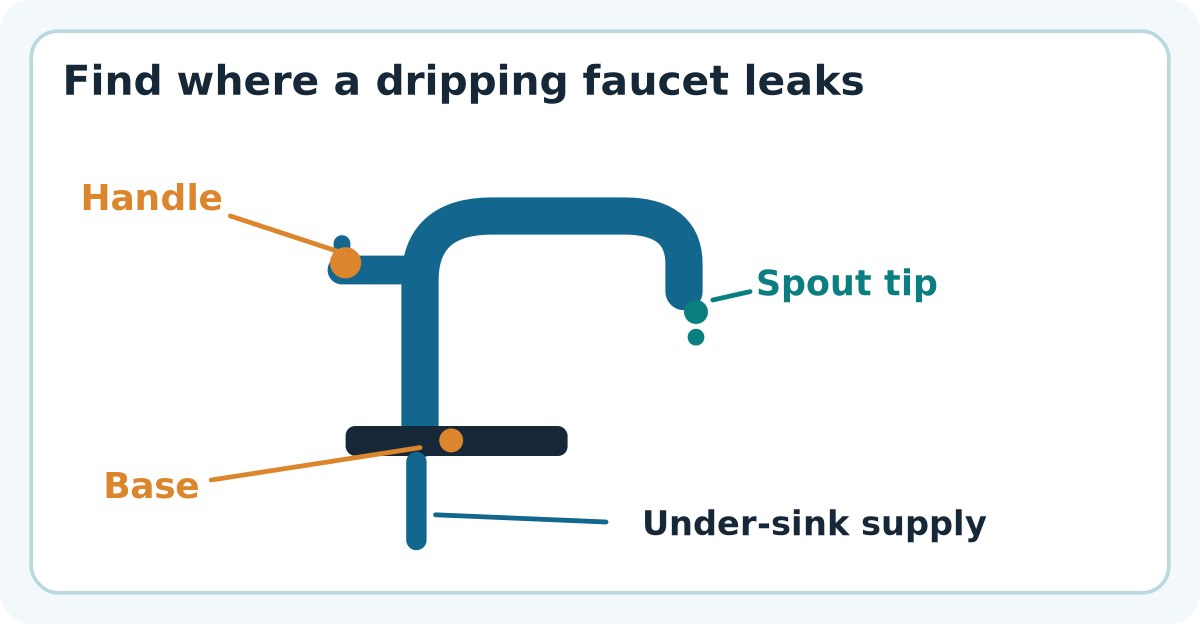
Spout tip: A shutoff/valve sealing problem is likely if dripping continues. Moen lists the cartridge as a frequent reason on its bathroom faucets; some two-handle Delta models instead use stem units, seats and springs. Handle: Water may be escaping around a valve stem or seal. Base: It can be run-off from the handle or a separate seal issue. Under the sink: It may involve connections or supplies and should not be treated as a harmless spout drip.
Step 2: identify the model before buying a part
Look for the brand on the spout, handle, mounting plate, label, receipt or installation booklet. If the model number is unavailable, photograph the complete faucet and compare it with the manufacturer’s product identification and parts diagrams. Do not assume that one brand’s cartridges or O-rings fit another, or even another series by the same brand. For a two-handle faucet, the hot and cold valve units may be different or may be installed in distinct orientations.
Do not replace the aerator to cure a continuous off-position drip. Aerators shape the flowing stream and can accumulate scale; they generally do not create the closed seal inside a faucet. Cleaning an aerator makes sense for a weak or uneven stream, not as a reliable first repair for an off-position leak.
Step 3: locate and check the isolation valves without force
- Clear access beneath the sink. Identify the hot and cold lines entering the faucet and their individual shutoff valves, if present. Keep towels ready.
- Inspect both valves, supply hoses and the cabinet surface for green corrosion, crust, cracks, drips or dampness. If you see these, stop and ask a qualified plumber or building manager.
- Only if the valves are clearly identifiable and move normally, turn them toward closed according to their design. Quarter-turn levers generally close when perpendicular to the flow; multi-turn valves close clockwise. Do not force a stuck handle.
- Open the faucet slightly and confirm water flow stops after pressure drains away. If water keeps flowing, do not start repair work: the shutoff may not seal or the wrong valve may have been turned.
- If you were only testing isolation, return valves to their original service position and check each for leaks. If a valve starts dripping or cannot be operated safely, stop and get professional help.
A working isolation valve is required before attempting internal valve replacement. A leaky or seized isolation valve is a separate repair, not a reason to pull harder with pliers. In a rental, hotel or shared building, ask maintenance before changing a water valve.
Decide the next repair by faucet type
Single-handle cartridge mixer: The next manufacturer-approved repair is often the correct replacement cartridge, after supplies are verified off and pressure is relieved. Two-handle compression faucet: A worn washer or valve seat can be the issue. Two-handle ceramic-valve faucet: The model may require its designated cartridge, stem or seat/spring parts. Touchless or electronic faucet: Sensors, solenoids and batteries introduce additional failure possibilities; follow its own troubleshooting manual and do not open electrical components.
Do not disassemble the handle merely to identify the model if a photograph, parts sheet or manufacturer support can do that first. Some cartridges are retained by clips or threaded retainers; incorrect removal can damage the body or cause flooding if water is not actually isolated.
If the checks do not solve it
Water is dripping underneath the cabinet
Protect belongings and stop use of the fixture. If a safe shutoff is available, isolate the leak without forcing fittings. A supply-line or valve leak warrants prompt professional assistance.
Water leaks only while the faucet is running
Inspect the location again. This may be a handle seal, spout joint or connection leak rather than a closed-valve drip. Refer to the correct manufacturer’s diagram.
One handle must be squeezed or turned harder every week
Do not use excessive tightening force to mask a failing internal seal. Identify the valve type and schedule replacement with the correct components.
There is strong vibration, banging or a sudden pressure change
Stop at basic observation. Supply pressure and pipe support issues are outside a simple faucet cartridge diagnosis.
Frequently asked questions
Can a faucet drip because of its aerator?
An aerator can hold a small amount of water after shutoff or cause a poor spray when blocked, but a persistent drip while the valve is closed usually indicates a sealing problem farther inside the faucet.
Can I replace the cartridge without shutting water off?
No. Follow the manufacturer’s instructions and verify both supplies are properly isolated before any disassembly. If isolation cannot be confirmed, hire a plumber.
How urgent is a slow drip?
Persistent dripping wastes water and should be addressed. A leak into the cabinet, damaged supply hose or a valve that will not turn off is more urgent because it can cause property damage.
Sources and further reading
- Moen Solutions: Bathroom Faucet: Dripping From The Spout (checked 2026-10-27).
- Moen Solutions: Bathroom Faucet: Leaking Around the Base of the Faucet (checked 2026-10-27).
- U.S. EPA WaterSense: Home Maintenance (checked 2026-10-27).
- Delta Faucet: 86408 Two Handle Widespread Lavatory Faucets – maintenance (checked 2026-10-27).
Use the checklists as you go, and confirm the result before moving on to a more involved repair.