How to Remove Mold from a Small Nonporous Surface Safely
For a genuinely small patch on a hard, nonporous surface, locate and correct the moisture source first. Protect yourself, avoid disturbing dry spores, scrub the mold from the hard surface with detergent and water, collect residue and dry the area completely.
Quick answer: For a genuinely small patch on a hard, nonporous surface, locate and correct the moisture source first. Protect yourself, avoid disturbing dry spores, scrub the mold from the hard surface with detergent and water, collect residue and dry the area completely. EPA says routine bleach use is not recommended for mold cleanup. Get professional advice for larger growth or vulnerable people.
A small accessible patch on glass, metal or hard plastic, well under approximately 10 square feet (about 0.93 m²), without contaminated sewage, hidden dampness or vulnerable occupant exposure. This is not a DIY protocol for drywall, ceiling tiles, carpet, porous wood, HVAC ducts or substantial water-damage remediation.
Before you begin: safety and materials
What you need:
- Detergent and clean water, disposable or washable nonabrasive cloths
- Protective gloves, appropriately fitted N95 respirator and sealed goggles for mold work
- Container for soiled wipes and a separate dry cloth
- Ventilation and safe way to repair or stop minor moisture accumulation
- Option to obtain professional environmental remediation guidance
Step-by-step instructions
Step 1: Check the area size, people affected and water history
EPA describes small areas as less than about 10 square feet, but even a smaller patch may need professional assistance if floodwater, sewage, hidden cavities, recurrent leaks or highly susceptible occupants are involved. Anyone with asthma or compromised immunity should avoid direct exposure and consult an appropriate professional.
Step 2: Stop the moisture problem before scrubbing
Identify condensation, an overflowing shower seam or a plumbing leak. Fix only an easy safe source such as running ventilation and wiping persistent condensation. If water is entering walls, ceiling or electrical fixtures, stop and call the appropriate qualified trade.
Step 3: Put on proper protection and contain splashes
Use gloves, close-fitting goggles and an appropriate N95 respirator as indicated in EPA’s mold guidance. Keep others away from the work area. Avoid dry sanding, wire brushing, sweeping or using a household fan to blow mold-laden dust around the room.
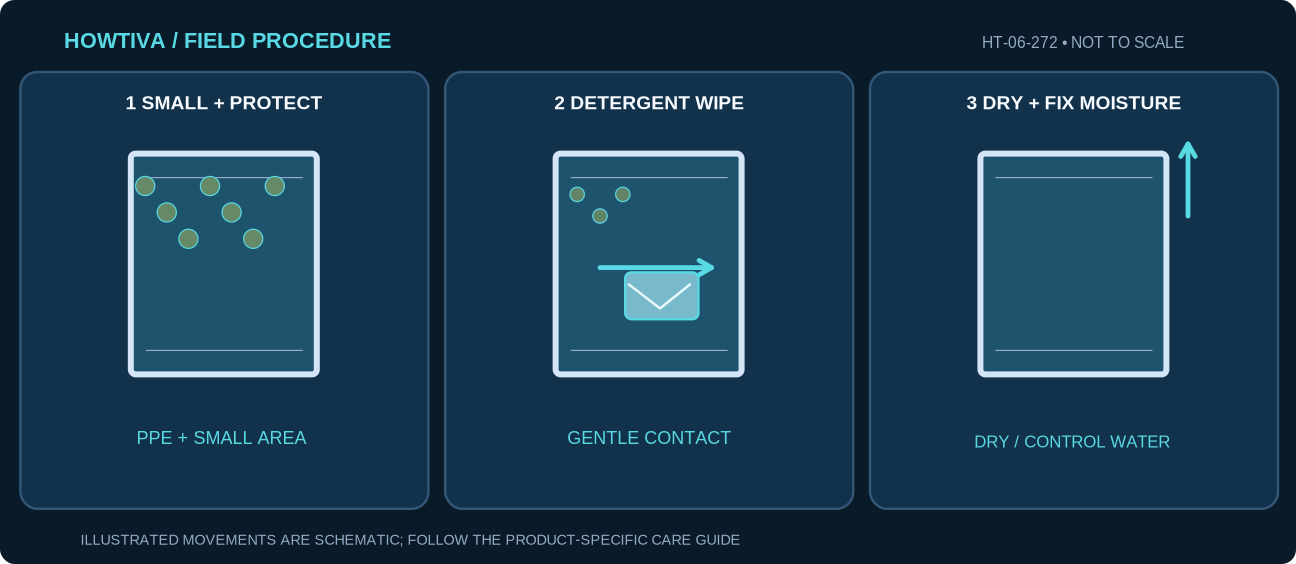
Step 4: Gently wash the hard surface with soap and water
Lightly dampen the affected area to reduce airborne dust and scrub surface growth with a cloth and detergent. EPA advises physical removal with water/detergent followed by full drying; spraying disinfectant alone does not remove allergenic dead mold fragments.
Step 5: Collect residue, rinse and dry completely
Wipe away loosened material without splashing surrounding fabrics; rinse the hard surface as its finish allows. Dispose of single-use cleaning materials safely and launder reusable items as appropriate. Dry the cleaned surface completely and address humidity; mold often returns when surfaces stay wet.
Step 6: Inspect for recurrence and escalate if necessary
Recheck once dry and monitor the moisture trigger. Rapid return, swelling, hidden odor or a growing patch suggests unseen contamination. Avoid painting or caulking over visible mold. Obtain qualified mold/water-damage assessment instead of repeatedly treating a symptom.
Practical examples: when the procedure changes
Small dots on glass next to a humid bathroom window
If the patch is truly small, the glass is nonporous and no vulnerable person is exposed, detergent and water plus complete drying may be suitable. Improve ventilation and condensation control.
Dark patches surround peeling paint near a leaking pipe
Paint and wallboard are not the same as bare glass. Stop DIY surface cleaning and investigate hidden moisture and porous materials with professional guidance.
Troubleshooting: what can go wrong
The dark staining remains after visible residue is removed: Some discoloration can persist, but removal and complete drying still matter. Do not increase to a dangerous mixture just to chase color.
The patch keeps returning: Find underlying dampness, leaks or condensation; surface cleaning is not a moisture repair.
A person becomes wheezy or irritated: Leave the area and seek medical advice as appropriate; arrange qualified cleanup instead.
More than one room shows growth: Reassess the total extent and hidden water source with a remediation professional.
Alternatives, materials and model differences
If the patch is on grout, wood, drywall or insulation, treat the material separately; the hard nonporous protocol may not be adequate. EPA specifically advises against routine bleach use for mold. If a specialty disinfectant is independently warranted, follow the product label and never mix products; do not claim disinfection substitutes for removing mold.
Stop conditions and when to request qualified help
Do not DIY mold after sewage intrusion, HVAC contamination, significant flooding, wide or hidden growth, electrical water damage, or when exposure risks are unacceptable. EPA suggests professional guidance for areas exceeding about 10 square feet; smaller situations can still require help. Never mix chlorine bleach with ammonia, acids or other cleaners.
Frequently asked questions
Does spraying bleach kill mold well enough?
EPA says routine biocidal treatment is not recommended. Remove mold physically from suitable hard surfaces and fix moisture; dead mold can still provoke reactions.
Can I clean mold from drywall using this guide?
No. Drywall is porous and may require disposal or professional remediation if moldy or water damaged.
Sources & further reading
-
US Environmental Protection Agency: What are the basic mold cleanup steps?
-
US Environmental Protection Agency: Mold Cleanup in Your Home
-
US Environmental Protection Agency: Should I use bleach to clean up mold?
-
US Environmental Protection Agency: Mold Course Chapter 6
Use the checklists as you go, and confirm the result before moving on to a more involved repair.