How to Clean a Sink P-Trap
Place a bucket beneath a removable P-trap, note the washer positions, clean the bend, then reconnect and leak-test.
Quick answer: To clean a sink P-trap, first confirm that it is a sound, accessible trap with removable slip-joint nuts and that no corrosive drain cleaner is present. Put a bucket underneath, gently undo the two trap connections, tip the water and debris into the bucket, clean the bend, then reassemble the washers in their original positions. Test with a small amount of water while watching for leaks. Do not loosen glued, corroded or unfamiliar drain connections.
A P-trap is the curved drain section beneath many sinks. Water stays in its low bend to provide a seal against sewer gases. This procedure covers a common removable tubular plastic slip-joint P-trap. Metal, bottle traps, integrated traps, flexible accordion pipes and nonstandard assemblies can use different components. If your sink does not match the diagram, consult its manual or a plumber instead of improvising.
Confirm that this is a suitable DIY job
Proceed only if the trap has two accessible connections you can identify, the pipes are firmly supported and there are no current signs of a leak, severe rust or prior sealant repairs. Cleaning a trap requires opening the wastewater pipe, so expect dirty water and some odor. Have gloves, a broad container, towels, a soft brush and a flashlight ready. A phone photo before loosening anything is useful for restoring the original alignment.
Do not open the trap if drain-opening chemicals might remain, if the water has backed up from the sewer, or if an electric garbage disposal is nearby and not safely isolated according to its manufacturer. If the trap is built into a wall or glued to its neighbors, stop. This is an inspection and cleaning job, not a guide to redesigning household drainage.
Identify the parts before removing them
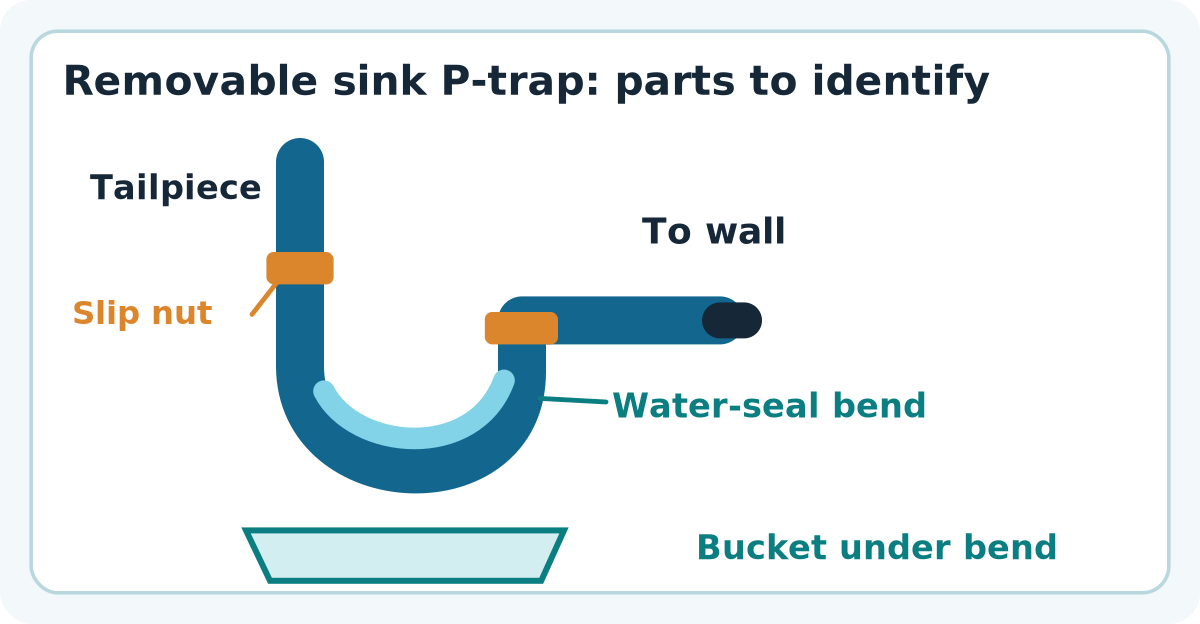
The tailpiece drops from the sink into the trap inlet. The low bend holds water. The trap arm leads toward the wall. Many removable kits use conical slip-joint washers: their shape and direction matter. Some have integral or captive washers instead. Record what you find rather than assuming a universal gasket orientation.
Step by step: remove and clean a removable P-trap
- Stop using the sink. Turn the faucet off and let the bowl drain as far as it can. If it holds standing water, bail it into a container so releasing the trap will not dump the entire basin into the cabinet. Avoid the job if unknown chemicals are present.
- Clear the cabinet. Place a bucket under the bend with towels around it. Photograph both slip nuts, washer locations and the pipe alignment before turning anything.
- Support the pipework. Grip the trap body with one hand and gently loosen the nuts with the other. Many plastic nuts can be loosened by hand. Do not twist the connected sink drain or wall pipe while working. Do not apply heavy leverage.
- Lower the bend into the bucket. Keep track of each washer and where it came from. Even after the basin has drained, the trap itself contains water by design.
- Remove debris. Tip sediment, hair or food material into the bucket, not back into the drain. Use a soft bottle brush and mild dish soap with warm water to clean the accessible bend. Inspect it for splits, flattened seals or damaged threads.
- Reassemble without forcing. Return washers to their original positions according to the manufacturer’s fitting design. Align the trap and pipe axes so the nuts start easily by hand. Tighten hand-snug; do not crush plastic fittings or use tape to replace a damaged slip-joint washer.
- Test slowly. Run a small trickle, observe both joints and the cabinet floor, then briefly fill the sink and let it drain. Dry each joint with tissue so a fresh drip is easy to spot. Recheck after several minutes.
Use a cloth to protect a metal finish only if a manufacturer-approved tool is actually necessary. If a nut is seized or a metal pipe moves with it, do not force the joint: corrosion can turn a cleanup into a broken pipe. Replace damaged washers with the correct part rather than tightening harder.
Where the removed wastewater goes
Pour the captured wastewater into an appropriate sanitary drain only when it is free of chemical drain opener and large solids; scoop solids into the trash first. Do not pour grease back into a sink. If the liquid may contain a chemical product, follow its label or ask your local waste service how to handle it. Wash the bucket and tools with mild detergent after the work and wash your hands.
What if the trap is clean but the sink still backs up?
A clean bend means only that the obstruction was not found there. The stopper above it may still hold hair, or debris may be farther into the trap arm or branch drain in the wall. Do not poke sharp wire into fittings or use a powered auger in unfamiliar lines. A professional can assess deeper obstructions, shared-line symptoms and proper venting.
Troubleshoot the reassembly
A joint leaks immediately
Stop water flow. Confirm the washer is present, clean, undamaged and oriented as originally installed, and that the threaded nut is not cross-threaded. If those checks do not produce a reliable seal without force, leave the sink unused and replace the compatible seal or call a plumber.
The nut will not thread on
Do not use more force. Misalignment or mixed parts can cause cross-threading. Return the sections to their original positions and confirm parts match. A nonstandard fitting requires its specific replacement part.
Odor appears after cleaning
Use a little clean water to replenish the trap’s water seal and verify that its bend is installed correctly. If an odor persists after flushing and checking for leaks, stop and seek plumbing evaluation; a missing water seal or venting defect cannot be solved by deodorizer.
The wall pipe or sink drain rotates when you turn a nut
Stop immediately. Supporting pipes and retaining watertight joints is essential. A damaged or moving fixed connection deserves professional attention.
Special cases that need different instructions
Bottle traps often have a bottom cap instead of a removable U-bend and may require an O-ring or manufacturer-specific gasket. Glued PVC drain fittings do not come apart at the glued seam. Kitchen disposals or dishwashers can add electrical and drain-hose components. In rented property or a shared building, consult maintenance rules before opening the trap.
Frequently asked questions
Do I have to shut off the water supply before cleaning the P-trap?
The P-trap is on the drain side, so it is not normally pressurized by the faucet supply. Nevertheless, keep the faucet off and prevent anyone turning it on while the trap is removed. If a nearby supply valve leaks or the assembly is complicated, stop rather than relying on this general guidance.
Can I replace the washer with plumber’s tape?
No. A slip-joint seal generally depends on its correct washer and alignment. Tape or sealant is not a substitute for a missing or damaged gasket.
Why is there water in the trap even when the sink is empty?
The retained water is normal; it forms the odor-blocking seal. Removing the bend empties it, and a successful reassembly should restore it when the sink is used again.
Sources and further reading
- Lowe’s: How to Unclog a Sink: 7 Easy Tips to Try (checked 2026-10-27).
- The Home Depot: How to Unclog a Kitchen Sink (checked 2026-10-27).
- U.S. CDC: Cleaning and Disinfecting with Bleach (checked 2026-10-27).
Use the checklists as you go, and confirm the result before moving on to a more involved repair.